Go back to Main Page > Documentation
This tutorial is aimed at the complete newcomer to Psycle (and tracking in general...). It will guide you from the very first time you start Psycle up to the completion of your first Psycle song.

Getting started...[]
This tutorial assumes you already have Psycle installed, and refers to Psycle v1.8.2.
The first time you start psycle, you may have to adjust the configuration according to your hardware. There is a "configuration" entry in the menu bar. Try to adjust the settings there if you get problems later on.
Psycle is a mature piece of software, but nothing is perfect: Psycle may crash, due to badly programmed plugins, corrupted files, fierce demons or whatever. So don't forget to save your data from time to time!
Make some noise...[]
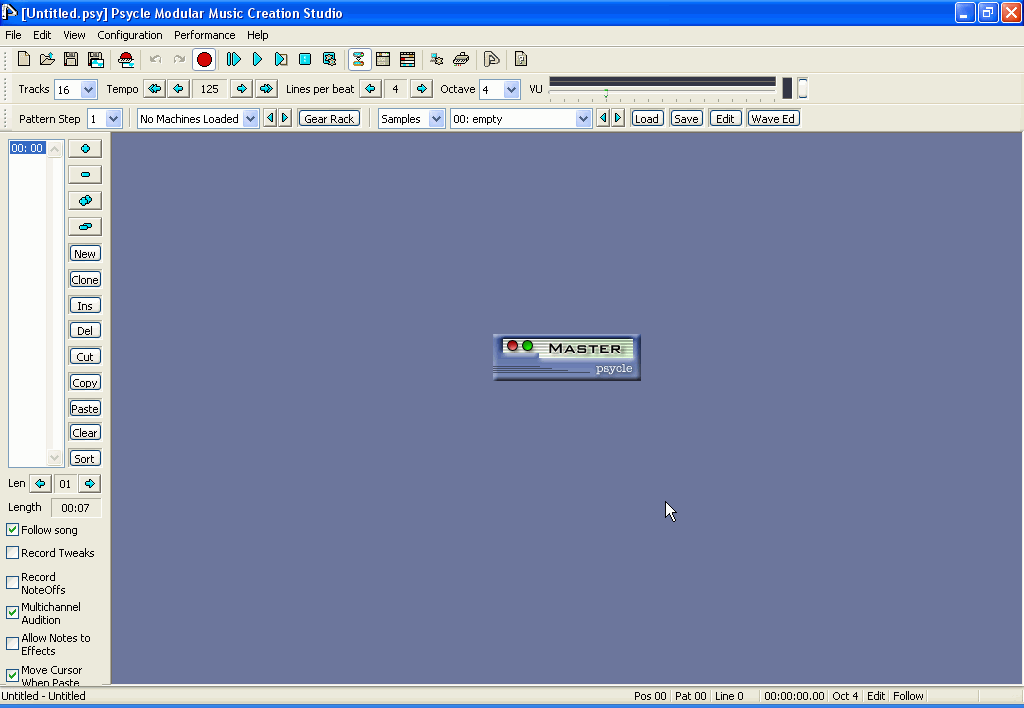
After the basic initial configuration, the first thing you'll want to do with your brand spanking new music studio is to make some noise. Sounds in Psycle are made with machines; if you're not already there, press F2 to get to the 'machine' view screen. It should look something like this:
The Machine View
The master machine will already be there sitting in the middle. We will talk about the master in more detail later on, but for now we just want to get some sounds out. To make sounds, we need to add a generator machine. To add any machine, you have to first bring up the Machine Dialog (see Picture). You can do this in a number of ways: either press F9, double click somewhere in the space in the middle of the screen, or select the relevant button at the top of the screen.
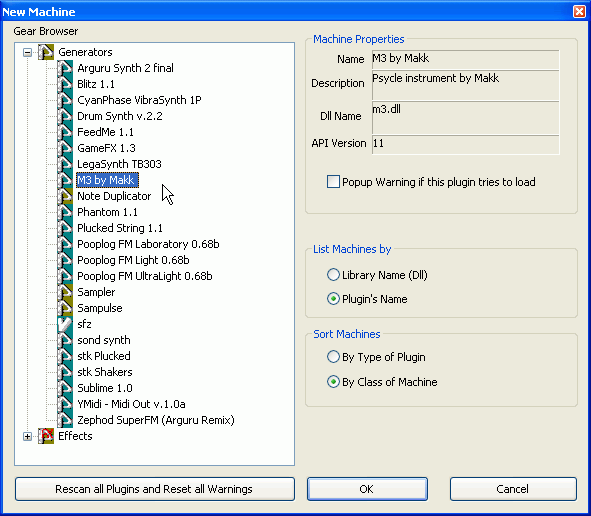
The New Machine Dialog
Machines are split into two categories: generators and effects. Additionally, any machine can be an internal machine, a native machine, or a VST. In general it makes things easier if you sort your machines into generators and effects, so click on the option to sort them like that in the right hand side of the dialog (Sort Machines -> By Class of Machine).
For the moment, we want a generator, so double-click on Generators in the left-hand side of the dialog. A list of all available generators will open (regardless of their type). We want to start our song off with a melody, so let's pick the M3 machine by Makk. Either double-click on it or click on it and select the OK button.
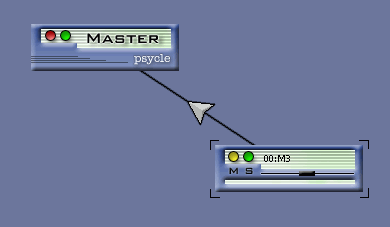
The dialog will disappear and now our new machine will be added to the machine space in addition to our master. Psycle works by connecting machines together in Chains, so let's hook up our new machine to the master. To do this, hold down the Shift key and left-mouse-button drag a line from the M3 machine to the master machine. Let go of the mouse and the shift key: a wire between the two machines should appear with a triangle in the middle.
Connected Machines
OK, the machines are connected so now for the moment of truth - press some keys! The majority of the alphabetic characters on your keyboard and some of the number keys each correspond to a musical note, so start playing! Hit some of the keys and you should get a sound out of the new generator. The bottom row of keys corresponds to lower notes and the top rows to higher notes. Try pressing notes from different rows at the same time. That's polyphony. Neat huh?
So, well, this is fun, and it sounds OK, but we could tweak it up a bit. Machines in Psycle don't just produce one fixed sound - you can tweak them to your heart's content until you get the sound you're after. To do this with our M3 machine, first double click on it to open up the Parameter dialog.
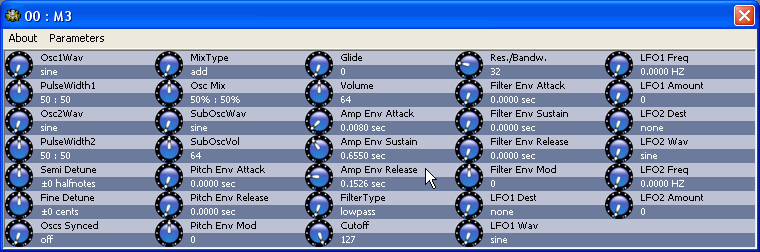
Parameter Dialog
Note: I like electronica/IDM, so the tutorial might be a bit biased in that direction... experiment with the parameters to make things sound more like your style of music!
Don't be put off by the vast number knobs and dials - for the moment we just want one, the Amp Release parameter, so don't let them get in the way (and later on you'll appreciate the flexibility of so many parameters!). The Amp Release parameter is in the middle somewhere.
Double click on the wheel to the left of the Amp Release parameter and drag the mouse up and down - you'll see the wheel move and the associated value will change. Drag it into a position close to 2. If you mouse hand is a little wayward, hold down Ctrl as you move the mouse to enable fine tuning, or for superfine-tuning hold down Shift while you move the mouse.
Now play around with the keys again - it sounds a bit nicer now eh?
By now you will probably have come across a nice little jingle as you've been playing the keyboard. Well, how's about we program that tune into Psycle now rather than playing it over and over again ourselves. Psycle is there to make life easy for you.
Program some noise...[]
To program our melody into Psycle we need to be in the Pattern View. To get there press F3 or click the pattern view button at the top of the screen.
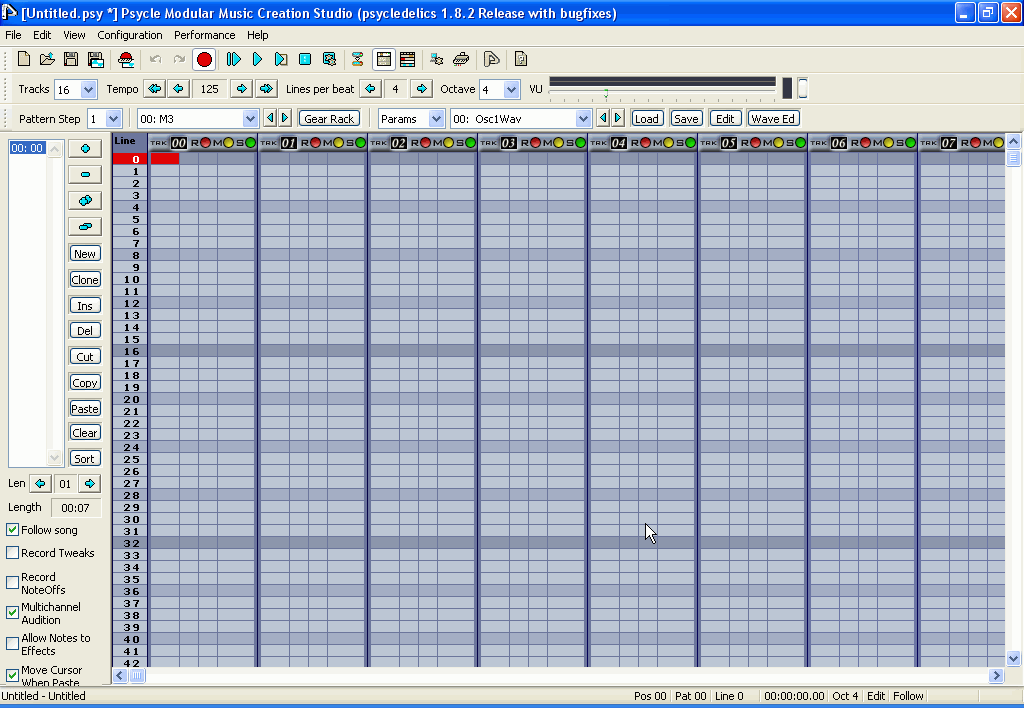
Pattern View
You'll be presented with a grid that should look like the one on the left. This is where we program in our tracks, and we refer to the grid as a pattern. As we're currently in Play Mode, pressing a key doesn't add anything to the pattern. Try it. We get the sounds we've been making, but nothing appears in the pattern. To start programming, we need to be in Edit Mode; to toggle between play mode and edit mode press the space bar.
Now when you press a note key, not only will the sound play, you'll add the details of that particular note to the pattern. Notice that the pattern is split up into a number of columns - these are called tracks. In the picture below, the third track is highlighted (though it is track number 02, because numbering starts with 00!).

A Pattern consists of Tracks
We want to add some notes to the very first line of the pattern, in the first and second track. Move to the top left corner of the pattern using either the arrow keys or by clicking on it with the mouse. If you're following the tutorial song, then press the n key to add the note A-4. Notice that we still hear the sound as we enter the note into the pattern.
OK, so we have a note! Now let us play. To start playback, press the f5 key or click the playback button at the top of the screen. You should see a coloured bar moving down the screen as it follows the playback.
Well.. Hmmm... OK so we have a note, but it isn't much of a song. We need to sort this out a little bit. First thing, this pattern is far too long. It's currently 64 lines long, a bit too much for our purposes. (We usually refer to these lines as ticks). Let's halve it down to 32. To do this, we need to edit the Pattern properties. Press Ctrl-Enter or right click anywhere in the pattern and select Pattern Properties from the drop-down menu. Change the number of lines to 32. You can change the name of the pattern too while you're here if you like, but currently that doesn't serve much purpose (you'll have to wait for 1.8.5, where naming patterns becomes more useful).
Now the pattern is a bit shorter (and should hopefully fit on the screen now), but things are still a little too slow. Let's push up the tempo a bit. You should see the following buttons at the top of your screen:
![]()
That's the tempo section. It should currently be at 125 - let's boost things up to 200. To move up or down 10 beats per click, use the double arrows, to move up or down one beat per click use the single arrows. To get to 200 you'll have to use both.
The sequencer
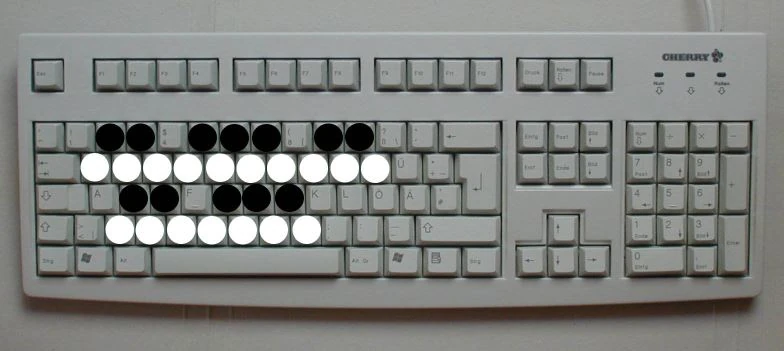
OK so now it's a decent speed, but we could do with a few more notes. But which key corresponds to which note? By default, the keys on your keyboard represent two octaves of a musical keyboard. On my german keyboard the first row of alphabetical characters is qwertzuiop and the q corresponds to the musical note c,the w corresponds to the musical note d and so on. Halftones lie on the respective number-keys. The second octave is represented by the lower two alphabetical key-rows. Try to get familiar with the keyboard layout.
Keyboard Layout
Add a C-6 (it should be q on your keyboard) to the first line of track 01. Add an E-4 and an E-5 to the 16th line of the first two tracks respectively. Handily, Psycle highlights every 4th beat in the pattern, so you can easily tell where the 16th beat is. If you entered the wrong note, you can delete it with the delete-key (backspace works a bit different... try it, if you want) Note that as track-numbering starts at 00, the second track is actually numbered 01.
So now we have a very short (and very repetitive) one pattern loop. You can see the length of the loop in the sequencer section to the left. Up to now, we can only see a 00:00 in the List, which means: On position 00 Psycle plays pattern number 00. Please note that pattern and position counting start from 00!
A two second loop is a little too short, so let's add another pattern. In the sequencer click on the new button to add a new pattern to the loop. Agh, it's 64 lines long again! You'll have to change the size to 32 as before. (Don't worry - we'll change the default length for new patterns later on).
Add the notes G-4 and B-5 to the first line of this new pattern (which is pattern number 01 as you can see in the sequencer section) and the notes D-4 and D-5 to the 16th line. And now... we have.. a melody! It's still a little repetitive, but we can add more later.
When your song gets more complex, you might want to repeat or rearrange some patterns. In our example, you might want to make psycle play the second pattern (pattern number 01) in the first position (position number 00) and vice versa. To achieve this, mark the position with a mouse-click and use the plus and minus icons next to the list. But for now, we are happy with our simple arrangement. Let's start to annoy our neighbours: we'll add some beats!
Beat it![]
As you might guess, we have to go back to the Machine View to add a drum-instrument. Just press F2 to get back (or click the button in the menu-bar). First we want to add a bassdrum to get some boom-boom-boom in our little song. Open the New Machine Dialog again (left double-click on the background) and find the machine "drum-synth" which is perfect for our purpose. Link the drum-synth to the master-machine and press a key to hear some boom-boom.
When your song gets more complicated, you'll have a bunch of different machines in the Machine View, and this easily can get very confusing. Rename your machines by right-clicking on them! In our song, rename the "M3"-Machine to "Melody" and click OK.
As we are already here, we could improve the "Melody"-Sound a bit. A left double-click opens the parameter dialog once again. You can change the knobs while psycle is playing the sound! You may want to change the waveforms with osc1wav and osc2wav, and the pulse widths of the oscillators, but of course you are free to fiddle around with the other parameters as well.
Now that whe have a cool sound, lets get back to the pattern view (press F3) to add the bass-drum to our score. But wait: we have to activate our drum-synth so we are entering drum notes instead of melody notes into our patterns. Just click once on the drum synth. Switch to edit-mode with the Space-key (if it isn't already activated) and put a boom on every 4th line in track number 02 (the third one!). Don't forget the second pattern! To get there, click on the appropriate sequencer position.
If you play the song once again, you will hear most likely a very distorted sound. In digital productions this is a common problem and there are various methods to get around these traps: Limiters, Compressors etc. For now, we choose an easy method, we will only lower the master volume automagically. Get back to Machine View and open the Parameter Dialog of the Master Machine. Click the checkbox "Decrease Master Volume...." and the problem should disappear.
Using Presets[]
We now want to add a Snare-Drum. Go back to Machine View, open the New Machine Dialog, select the "Sublime" Synthesizer, connect it to the Master. If you play an note, it doesn't sound at all like a snare drum. So enter the Parameter Dialog of the "Sublime" Machine and look at the menu-bar of that window: Select Parameters -> Open Preset Dialog and select the Snare drum. Et Voila! Just like we did with the bass drum, you can now enter Snare notes in the Pattern-View as you like. Be creative!
Now its time to fix the levels a bit. To my ears, the snare-volume is a bit too low. Go to the Machine View and do a right click on the wire between Snare and Master. Raise the volume to an appropriate level and close the window. You are now ready to produce every kind of melody, but to make your song more interesting by using effects etc. you have to read on.
Special Effects[]
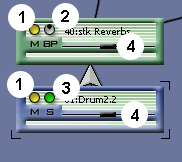
While this first song probably isn't a chartbreaker already, we'll try to spice up the sound. An easy to hear soundeffect is a reverb on the drums. So switch to the machine view, open the new-machine dialog and search for the "stk reverb". Having the machine on the screen, you need to rewire the instruments. Right-click the wire going from snare to master, hold the mousebutton and drag the wire onto the reverb-machine. (You also could have done this with shift-left-click ...) Do the same with the bass-drum. If you play the song now, you won't hear anything, because, the reverb hasn't been connected to the Master yet. Do this, and you'll hear your drums reveberated. To tweak the reverb-sound, open the parameter-dialog of the reverb machine.

(1) Mute machine
(2) Bypass effect
(3) Solo (mute every other generator)
(4) Panning
While tweaking the reverb settings, hearing the melody is inconvenient, so switch it off by pressing the mute-switch on the M3-machine. There are other switches on the machines which are quite handy while adjusting sounds: A solo-switch on the generators, and a bypassing and a mute-switch on the effects. On every machine there is a panning-slider for stereo-adjustments.
By the way: There can be more than one wire coming from one machine. This can be useful for example if you want to add a delay to the snare, but you don't want to have the delayed sound reverberated, only the orignial sound.
Generic modification[]
--now we've heard this loop over and over again, let's lengthen it a bit
--click on pattern 00
--click clone--it's in the wrong order! sounds like a stuck record
--cut it out and paste it after 01
--now do same with 01 and put it after 02
--it's still the same loop! but, now we can change it up a little
--in pattern 01, in the high melody track, add e-5 f-5 at 24 28 resp.
--wait... that's still the snare!
--delete those erroneous notes by moving to them (with mouse or arrow keys)
and pressing del
--we need to change back to the melody machine
--either pick it from the drop down or use crtl-left ctrl-right
--psycle through the machines a little bit to get the feel for it!
--stop at melody
--now add the right melody line
--add a little extra to pattern 03 -- add the reverse
--that's a little better!
--now let's flesh the sound out a little with some effects!
Free Samples[]
--now let's add another element, and learn about an important little machine--the sampler
--add sampler in machine view
--WRITE SOMETHING ABOUT WHAT THE SAMPLE DOES -- OLD SKOOL TRACKING ETC.
--you will see now that the sampler is selected in the gear rack--if you look to the right
of this, you'll see a samples selected in another drop down menu
--click on load and navigate to the sample provided
--add the sample to the first beat of pattern 00 (use track 03)
--but note! we need to lower the octave a bit--sounds like alvin chipmunks
--use the menu or preferably the plus and minus keys to lower the octave to 2
-- add c-2
--now the sampler has a nifty instrument editor, a throw back to the days
when all people used was samples
--click f10 or press the button
--lots of options--for now all we want to do is add random panning
--add some nice stereo effects to the song
--now's a nice time to try out the 'solo' feature in the machine view
--click solo on your melody machine (note how it's automatically unmuted)
--while we're at it, let's have a play with the pan feature
--clikc on the thing and move it left to right--fun! put it back in center
--now click on the bypass button of the MELODY reverb
--unsolo the melody and have the whole loop come in
--after a few bars remove the bypass--see the difference?
--well, we have a 4 pattern loop now--your machine view should look
something like this, and your pattern view like this
--wait a minute! they don't look like that!
--well, let's do something about that, shall we. time for some
customisation
--let's have a break from the music for a bit while we're doing it. turn it off
with f8 or the stop button.
Skinning Psycle[]
Psycle gives you a great deal of flexibility when it comes to how you want it to look. You can fiddle with it all yourself, or let others do it for you with the pre-produced 'skins', downloadable from Psycledelics here.
To change the settings, go to Configuration --> Settings. The first tab, Visual, should be selected.
- picture of settings dialog with visual selected
You can fiddle around with the options here yourself but for the moment it makes life easier to use one of the skins. The one I use (shown in the image above) is _Red Dwarf_ by rhino (downloadable from here). Load up the skin by clicking the button at the bottom right and selecting the file provided.
The one thing you might want to tinker with yourself is the background bitmap--you can change the picture displayed as a background to your machine view. I find the 3D wallpapers provided at DeviantArt? to make great backgrounds (if you like the whole 3D futuristic look). To change your background click the button halfway down the right hand column--click on it and select your picture from wherever it's stored.
That's the looks taken care of, now lets alter the way the program works a little. Click the Keymap and Misc tab at the top.
- picture of keymap dialog
The 'Keymap' section let's you change what keyboard shortcuts are used for various commands. There's no real need to change any of the shortcuts, as they're pretty intuitive already. It's worth taking a look at the list of commands however--there's various commands only available through the keyboard!
The behaviour section is mainly down to personal preference. GO INTO MORE DETAIL LATER ON
In the miscellaneous options section, however, there are two options that everyone should definitely have selected: autosave and save reminders. Make sure they're on! They'll save you from many a lost file in the future.
Remember earlier on we made a new pattern which was too long? This is where we fix that--the third option in the miscellaneous options sectio sets the default length for new patterns. In the case of this tutorial we would want it to be 32, but again in general this is down to personal preference.
Directories and Input/Output tabs we dealt with earlier on at the start of the tutorial [BUT MAYBE MORE DETAIL HERE?]. The Midi section we will save for a more advanced tutorial.
Tweak Tweak[]
- Controlling/Tweaking Generators and Effects
---------------------------------------------
Tweaking a machine from the pattern is changing the value of its knobs to
another one.
This way, you can control the machine in realtime (playback).
To do so, you use the TWEAK command. You see it like "twk" in the note Row.
You can also use the TWEAK SMOOTH command. It is displayed as "tws" in the
note Row.
"tws" differs from "twk" in the manner that "tws" smoothly alters the parameter
from it's CURRENT position to the position during the time of one line in the
pattern; "twk" happens instantaneously. "twk" is useful for parameter changes
and initializing knobs at the beginning of your songs, and uses very little
overhead; "tws" is usefull for smooth filter sweeps, fades, swells, etc, as it
essentially sends an interpolated twk command every 64 samples.
- How to insert the TWEAK or TWEAK SMOOTH command in the Pattern
------------------------------------------------
If the following is a pattern Row,
Description: (1) (2)(3) (4)
Pattern Row : ---- .. .. ....
then, on (1) , you insert the TWEAK command. To do so, you should press the TWK key.
When doing so, the word "twk" will appear. There is a separate key for "tws".
\\\ The twk key differs from different keyboard languages, but you can Configure
/// it in the Keyboard Settings DialogBox (Configuration-Settings, and there the
"Keyboard and Misc." tab)
On (2) , you define the Controller/Parameter you want to change. Later in this
document it is explained how you can know this number.
On (3) , you specify the number of the Machine, just like you do to enter notes.
This number is the one shown in the combobox, or in the machine's dialog.
Finally, on (4), you specify the Value that the parameter will take. There are
little differences between tweaking a Native Plugin and a VST plugin. Look further on
this document to know them.
Example:
twk 05 42 0067 05 Indicates Parameter 05
42 Indicates Effect Number 2
0067 Indicates the value
--> Psycle can fill tweaks for you, using its interpolate option. Put the start value at
the start line, the end value in the end line, select all the rows between them plus them both
and select Interpolate in the rightclick popup menu. This is very handy for smooth
sweeps with tws.
--> You can also make psycle record your tweaks live, either with mouse or MIDI:
1) Go to the config/keyboard dialog, and make sure you have either tws checked if that
is the mode you would like to record. If you want to record twk commands instead,
uncheck it.
2) Make sure you have "record tweaks" checked in the right under the sequencer.
3.1) To record tweaks with mouse:
* Open the gui for the machine you want to record tweaks from.
3.2) To record tweaks with midi:
*) Go to the Midi Controllers menu, and set up the controller and range of information
that you want to record. You will need to know the parameter number for the machine
you are recording.
If the (VST) machine allows it, you might preffer to use "Record RAW MIDI Commands".
4) Go to the pattern editor and arm the track you want to record in. (Select the record button
on the track header)
5) Make sure you're in edit mode (See the record button in the playback toolbar, or the word "Edit"
down right in the status bar).
6) Press play and start tweaking.
- Knowing the Parameter number of a Machine
-------------------------------------------
You have different ways to know the parameter number of one plugin.
* The easiest one is selecting "Params" in the "MIDI/Params/Waves", combobox.
This way, the next combobox will be updated with the parameter list of the current
selected machine.
The selected number will automatically be added to the pattern when doing twk.
You could also know it by:
* With Native Machines:
Opening the parameters' windows and right clicking over the parameter you want to
change.This will pop up the "Tweaking" dialog.
On the titlebar of this dialog, you will see a number in HEX. This is the number
of the parameter.
Also, in this dialog, now you have a complete "twk" line that shows you the value
that you'd use to set this parameter to the current value.
* With VST plugins:
Opening the parameters' window, you have the option to show the parameters list
via the "View" Menu. This will popup a window with a list of the parameters
numbered in HEX. This is the number you need.
- Knowing the Right Value
-------------------------
There are differences between VST plugins, Psycle plugins and internal plugins:
* VST Plugins:
They have a fixed range. 0 is the smallest value, and FFFF is the biggest.
* Psycle Native Plugins:
They have a range defined by the knob. You need to move the knob to the
desired position and right click over it to open the "Tweaking" dialog, which shows
you an editbox to put a value manually, and also a complete "twk" line that
you'd use to set this parameter to this value.
Advise: As you'd see, if the knob's minimum value is not zero (Like, with the VCF Envmod),
0 = min value
* Psycle Internal machines:
Use the same procedure than with Native plugins.
- Mcm Command. Use MIDI CC's to control VST Plugins
-----------------------------------------------
The Mcm command works in a similar way than the Twk Command:
If the following is a pattern Row,
Description: (1) (2)(3) (4)
Pattern Row : --- .. .. ....
then, on (1) , you insert the Mcm command.
To do so, you should press Mcm key. Check and/or change its value in the Keyboard
Configuration dialog (Configuration-settings).
On (2) , you define the Midi command number that you want to send.
You might need to check some MIDI documents and/or the Plugin's help to know what
to write in here.
On (3) , you specify the number of the Machine, just like you do with tweaks.
This number is the one shown in the combobox, or in the machine's dialog.
Finally, on (4), you specify the Value to send for this midi command.
(4) is divided in two groups of two values AABB.
Some commands might only need AA.
Usually, you'll use it to send midi CC's. CC Command is "B0".
Example, this sets the machine volume to half of it:
Mcm B0 01 0740
B0 Send a midi CC (Control Change) command (MIDI channel 1)
01 to the Generator number 1
07 in order to change CC7 (channel volume on most synths)
40 to 40 (in a scale of 0 to 7F, HEX)
- Mcm Command with Native plugins. Send a command to a desired channel.
-------------------------------------------------------------------
The Mcm command can also be used for another purpose with Native plugins.
It allows to send a command to another channel. This way, you can workaround
the limitation where you can only put one of them per channel.
Syntax is as follows:
If the following is a pattern Row,
Description: (1) (2)(3) (4)
Pattern Row : ---- .. .. ....
on (1) , you insert the Mcm command.
on (2), insert the channel (track) number where the command will be sent to.
on (3), insert the machine number
on (4), insert the command that you want to send.
Example: Send command 0C50 to channel 02 of machine 06:
mcm 02 06 0C50
- Pattern Commands
------------------
Psycle also allows to use some "old school" commands in the command row.
The currently supported ones are:
* Global/Tracker Commands:
FFxx - Change BPM
FExx - Extended command:
FE0x
FE1x Change Tick Per Beat
FE2x Set Bypass ( 0 off, else on)
FE3x Set Mute (0 off, else on)
FEBx Set Pattern Loop ( FEB0 set loop start, FEBx number of loops)
FEDx Set Pattern Delay. ( x = number of lines+1 )
FEFx Set Pattern Fine delay in ticks ( lines = 1+((ticks*linesperbeat)/24) )
FDxx - Delay Trigger (xx/256 ticks) (works with noteoffs too)
FCxx - Change Global/Wire Volume
Examples:
--- .. .. FC80 Sets Global Volume to the half.
--- 01 05 FC40 Sets Wire 1 of GENERATOR 5 to volume 40 (1/4th)
--- 01 45 FC30 Sets Wire 1 of EFFECT 5 to volume 30.
Aux column indicates the wire number.
It is shown in the _title_ of the wire Dialog.
FBxx - Retrigger (xx/256 ticks duration per trigger)
FAxy - Retrigger Continue (x/16 = ticks duration per trigger,
0 = use current) (y = acceleration, 1-8 pos, 9-f negative
f is the slowest negative acceleration, 1 is slowest
positive acceleration) * does not trigger on new line, rather
continues from previous retrigger position
F8xx - Sets the indicated Machine's Panning
Example:
--- .. 05 F880 Sets the panning of Generator 5 to 80 (Middle)
F3xx - Jump to sequence order number xx.
F2xx - Jump to next sequence order, and to the line xx.
* VST Commands:
0Cxx - Set volume ( Velocity on noteon, Expression otherwise )
C1xx - Set pitch bend range of the VST.
C2xx - Panning position for the midi channel.
C3xx - Slide to note with speed xx.
Dxyy - Pitch slide down x number of semis, yy speed.
Exyy - Pitch slide up x number of semis, yy speed.
10xx - _OLD_ MIDI Command. Not documented anymore. Use the "Mcm" command.
NOTE : If your VST supports legato, this effect can be triggered leaving the machine index empty:
Example:
C-5 00 02 ....
... .. .. ....
E-5 00 .. .... <- this note legates (does not stop previous)
* Sampler Commands:
01xx - Portamento Up
02xx - Portamento Down
08xx - Set panning position
09xx - Set sampler offset
0Cxx - Set volume
0ECx - Note cut in x frames
0EDx - Note delay in x frames
15xy - Retrig Command. y = Number of retrigs (1 = do one retrig)
- x changes the volume in the following way:
0 or 8 : No change
1: +1 9: -1
2: +2 A: -2
3: +4 B: -4
4: +8 C: -8
5: +16 D: -16
6: *2/3 E: *3/2
7: *1/2 F: *2
* Argury Synth 2f ( Also other (old) Arguru Synths) :
01xx - Pitch slide-up
02xx - Pitch slide-down
03xx - Pitch glide
04xx - Vibrato [x=depth, y=speed]
07xx - Change VCF ENV modulation [00=-128,FF=128]
08xx - Change VCF Cutoff frequency
09xx - Change VCF Resonance amount
0Exx - Note Cut in x frames (Only AS2.xx)
11xx - VCF Cutoff slide-up
12xx - VCF Cutoff slide-down
* JMDrum Synth:
0Cxx - Set volume
Interpolate this[]
• to do...
Tutorial History[]
• v0.01 -- Half-finished version by Mutilus uploaded to new wiki [ed. - old wiki, in fact].
• v0.01a -- Fixed deviantart from .net to .com by DJMirage
• v0.01b -- A couple of little tweaks, copied over to mediawiki by TranceMyriad.